Introduction and Important Notes
- By "server" we are referring to the computer that will be hosting the ACT! database(s). By "workstation" we are referring to any of the computers that are accessing the ACT! database(s) that reside on the server.
- Opportunistic locking, if enabled, will corrupt ACT! databases, therefore opportunistic locking must be disabled to avoid corruption of your ACT! database(s). Please see the section titled Opportunistic Locking for instructions to disable opportunistic locking, if necessary.<
style='font-size:9.0pt;font-family:Tahoma'>
- If Windows 95 is being used on any of the ACT! servers or workstations, you must be sure the VREDIR.VXD and VNETSUP.VXD files have been updated. If they have not been updated, the computers will cause corruption in the ACT! database(s). Please see the VREDIR.VXD on Windows 95 section of this document for information about determining if the files have been updated and how to update the files, if necessary.< style='font-size:9.0pt;font-family:
Tahoma'>
- If Windows 98 is being used on any of the ACT! servers or workstations you must determine the manufacturer of the installed network card. If any of the computers have Realtek network cards, you must be sure the network card drivers have been updated. If the computers have the original drivers provided by Microsoft for Realtek network cards then the computers will cause corruption in the ACT! database(s). Please see the Realtek Network Cards and Windows 98 section of this document for information about determining the manufacturer of the installed network card and updating the driver, if necessary.< style='font-size:9.0pt;font-family:Tahoma'>
- If any of the ACT! servers or workstations are running Windows 95, 98, or ME you should check the CONFIG.SYS file to be sure that some variables are set correctly. Please see the Windows 95, 98, and ME Configuration File section of this document for information on how to check the CONFIG.SYS file and set the necessary variables correctly, if necessary.< style='font-size:9.0pt;font-family:Tahoma'>
- For information on how to share an ACT! 5.0, or higher, database over a network please see the following document:
Title: How to Share an ACT! Database on a Local Area Network (LAN)
View This Document
Opportunistic Locking
- If the server sharing the ACT! database(s) is running Windows 95, 98, or ME, you do not need to be concerned about opportunistic locking, because these versions of Windows do not use opportunistic locking when used as a server.
- If the server sharing the ACT! database(s) is running Windows NT, 2000, or XP you must disable opportunistic locking on the sever and all workstations that are running Windows NT, 2000, or XP. Please see the Disabling Opportunistic Locking for a Windows NT, 2000, or XP Server section of this document.
- If the server sharing the ACT! database(s) is running Novell NetWare, you must disable opportunistic locking on all workstations that access the ACT! database(s). Please see the Disabling Opportunistic Locking for a NetWare Server section of this document for instructions to disable opportunistic locking on the workstations.
- For more information on Opportunistic Locking under Windows NT, please see the Microsoft Knowledge Base article Q129202, which is available at the following location: <
style='font-size:9.0pt;font-family:Arial;color:blue'>http://support.microsoft.com/support/kb/articles/q129/2/02.asp. For more information on Opportunistic Locking under Windows 2000, please see the Microsoft Knowledge Base article Q296264, which is available at the following location: < style='font-size:9.0pt;font-family:Arial;
color:blue'>http://support.microsoft.com/support/kb/articles/q296/2/64.asp.
Disabling Opportunistic Locking for a Windows XP, 2000, or NT Server
- On computers with ACT! installed you can disable opportunistic locking by using the 5.0.4 version of the ACT! Data Diagnostic Tool (ACTDIAG). For information about using ACTDIAG 5.0.4 to disable opportunistic locking please see the Using ACTDIAG 5.0.4 to Disable Opportunistic Locking section of this document.
- If the server does not have ACT! installed you will need to edit the Windows registry to disable opportunistic locking on the server. Please see the Manually Disabling Opportunistic Locking section of this document for directions to disable opportunistic locking by editing the Windows registry.
Using ACTDIAG 5.0.4 to Disable Opportunistic Locking
On computers with ACT! 5.0, or higher, installed you can disable opportunistic locking using the ACT! Data Diagnostic Tool (ACTDIAG) once ACTDIAG is updated to version 5.0.4. The 5.0.4 version of ACTDIAG is not currently included on the < style='color:black;
background:#DBDDBA'>ACT! installation CD. To download and install the ACTDIAG 5.0.4 update, please see the following document:
Title: ACTDIAG: The ACT! Data Diagnostic Tool
View This Document
Once ACTDIAG is updated to version 5.0.4, use the following procedure to disable opportunistic locking:
2. Click the Windows Start button, and then click Run. The Run dialog appears.
3. Type actdiag into the Open field, and then click OK. The ACT! Data Diagnostic Tool will open.
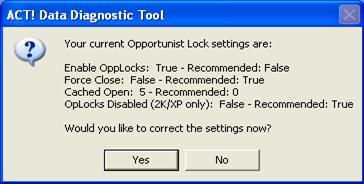
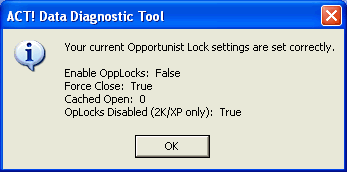
4. Click the Options menu, and then click Opportunistic Locking on NT/2000/XP. You will receive one of the following dialogs:
5.
6. If you receive the first dialog, click Yes to correct the settings now. If you receive the second dialog, click OK.
7. If you click Yes on the first dialog, you will be prompted to reboot the computer for the change to take effect. Click OK.
Manually Disabling Opportunistic Locking for Windows XP
1. Log into Windows as a user that has permissions to edit the registry. If you are unsure how to do this contact the administrator that maintains or setup the computer.
2. Click the Windows Start button, and then click Run.
3. Type Notepad and click OK. Notepad launches
4. If you are reading this document on the ACT! Web site, copy the following text to the Windows Clipboard, and then paste it into Notepad. Otherwise, type the following text exactly as it appears:
REGEDIT4
[HKEY_LOCAL_MACHINE\SYSTEM\CurrentControlSet\Services\LanmanServer\Parameters]
"EnableOplocks"=dword:00000000
[HKEY_LOCAL_MACHINE\SYSTEM\CurrentControlSet\Services\MRXSmb\Parameters]
"OplocksDisabled"=dword:00000001
[HKEY_LOCAL_MACHINE\SYSTEM\CurrentControlSet\Services\LanmanWorkstation\Parameters]
"UseOpportunisticLocking"=dword:00000000
5. In Notepad, place the cursor on the UseOpportunisticLocking line and press the End key. Then, press the Enter key to add a blank line. (There must be at least one blank line at the end of the file.)
6. Choose File, Save As, and then type "C:\OPLOCKS.REG" (including the quotation marks).
7. Click Save, then exit Notepad.
8. Click the Windows Start button and choose Run.
9. Type C:\OPLOCKS.REG and click OK to merge the file into the registry. You should get a message indicating that the file was successfully merged.
10. To verify the registry was properly updated, click the Windows Start button and choose Run.
11. Type regedit, then click OK.
12. Navigate to the following key (folder)
HKEY_LOCAL_MACHINE\SYSTEM\CurrentControlSet\Services\LanmanServer\Parameters
Verify that the EnableOplocks entry exists.
13. Navigate to the following key (folder)
HKEY_LOCAL_MACHINE\SYSTEM\CurrentControlSet\Services\MRXSmb\Parameters
Verify that the OplocksDisabled entry exists.
14. Navigate to the following key (folder)
HKEY_LOCAL_MACHINE\SYSTEM\CurrentControlSet\Services\LanmanWorkstation\Parameters
Verify that the UseOpportunisticLocking entry exists.
15. Exit any open programs and reboot the computer.
Note: You must reboot the computer for the changes to take effect.
Manually Disabling Opportunistic Locking for Windows 2000
1. Log into Windows as a user that has permissions to edit the registry. If you are unsure how to do this contact the administrator that maintains or setup the computer.
2. Click the Start button and choose Run.
3. Type Notepad and click OK.
4. If you are reading this document on the ACT! Web site, copy the following text to the Windows Clipboard, and paste it into Notepad. Otherwise, type the following text exactly as it appears:
REGEDIT4
[HKEY_LOCAL_MACHINE\SYSTEM\CurrentControlSet\Services\LanmanServer\Parameters]
"EnableOplocks"=dword:00000000
[HKEY_LOCAL_MACHINE\SYSTEM\CurrentControlSet\Services\MRXSmb\Parameters]
"OplocksDisabled"=dword:00000001
5. In Notepad, place the cursor on the "OplocksDisabled" line and press the End key. Then, press the Enter key to add a blank line. (There must be at least one blank line at the end of the file.)
6. Click the File menu, click Save As, and then type "C:\OPLOCKS.REG" (including the quotation marks).
7. Click Save, then exit Notepad.
8. Click the Windows Start button and choose Run.
9. Type C:\OPLOCKS.REG and click OK to merge the file into the registry. You will get a message indicating that the file was successfully merged.
10. To verify the registry was properly updated, click the Windows Start button and choose Run.
11. Type regedit, then click OK.
12. Navigate to the following key (folder)
HKEY_LOCAL_MACHINE\SYSTEM\CurrentControlSet\Services\LanmanServer\Parameters
Verify that the EnableOplocks entry exists.
13. Navigate to the following key (folder)
HKEY_LOCAL_MACHINE\SYSTEM\CurrentControlSet\Services\MRXSmb\Parameters
Verify that the OplocksDisabled entry exists.
14. Exit any open programs and reboot the computer.
Note: You must reboot the computer for the changes to take effect.
Manually Disabling Opportunistic Locking for Windows NT 4.0 or 3.51
Note: Running the ACT! 4.0 or 2000 program under Windows NT 3.51 is not supported; you may, however, store your ACT! data files on a computer running Windows NT 3.51.
1. Log into Windows as a user that has permissions to edit the registry. If you are unsure how to do this contact the administrator that maintains or setup the computer.
2. Click the Start button and choose Run.
3. Type Notepad and click OK.
4. If you are reading this document on the ACT! Web site, copy the following text to the Windows Clipboard, and paste it into Notepad. Otherwise, type the following text exactly as it appears:
REGEDIT4
[HKEY_LOCAL_MACHINE\SYSTEM\CurrentControlSet\Services\LanmanServer\Parameters]
"EnableOplocks"=dword:00000000
[HKEY_LOCAL_MACHINE\SYSTEM\CurrentControlSet\Services\LanmanWorkstation\Parameters]
"UseOpportunisticLocking"=dword:00000000
5. In Notepad, place the cursor on the "UseOpportunisticLocking" line, then press the End key. Press the Enter key to add a blank line. (There must be at least one blank line at the end of the file.)
6. Click the File menu, click Save As, and then type C:\OPLOCKS.REG (under Windows NT 4.0, surround the text with quotation marks: that is, "C:\OPLOCKS.REG").
7. Click Save, then exit Notepad.
8. Click the Windows Start button, then click Run. (In Windows NT 3.51, click the File menu, then click Run.)
9. Type C:\OPLOCKS.REG, and then click OK to merge the file into the registry. You will get a message indicating that the file was successfully merged.
10. To verify the registry was properly updated, click the Windows Start button, then click Run.
11. Type REGEDIT and click OK.
12. Navigate to the following key (folder)
HKEY_LOCAL_MACHINE\SYSTEM\CurrentControlSet\Services\LanmanServer\Parameters
Verify that the EnableOplocks entry exists.
13. Navigate to the following key (folder)
HKEY_LOCAL_MACHINE\SYSTEM\CurrentControlSet\Services\LanmanWorkstation\Parameters
Verify that the UseOpportunisticLocking entry exists.
14. Exit any open programs and reboot the computer.
Note: You must reboot the computer for the changes to take effect.
Disabling Opportunistic Locking for a NetWare Server
A workstation must run a NetWare redirector to see a Novell NetWare server. In Windows, this redirector is called Client Service for NetWare or Gateway Service for NetWare. This service allows access to NetWare servers and their resources. Opportunistic Locking is disabled by changing the settings for this redirector on each workstation.
To disable Opportunistic Locking the following process must be done on all workstations that access an ACT! database from a NetWare server:
1. Exit any open programs, then launch Windows Explorer.
2. For Windows 95, 98, ME, or NT, right click on Network Neighborhood or My Network Places, then click Properties from the shortcut menu. For Windows 2000 and XP, right-click on My Network Places, select Properties from the shortcut menu.
3. Right-click the Local Area Connection that connects to the NetWare server, then click Properties from the shortcut menu. The Network Properties dialog appears.
4. Double-click on the Client 32 NetWare Client (or select it and click Properties).
5. Under the Advanced tab, ensure the following settings are in effect:
cache writes=off
file cache level=0
true commit=on
6. Click OK to close the Network Properties dialog, then reboot the computer.
Note: You must reboot the computer for the changes to take effect.
VREDIR.VXD on Windows 95
- The VREDIR.VXD and VNETSUP.VXD files that are installed with Windows 95 have a bug that will cause corruption of files accessed over a network, including ACT! databases.
- All servers and workstations running Windows 95 should have the updated versions of VREDIR.VXD and VNETSUP.VXD. See the "Checking File Versions" section of this document for instructions on how to check the versions of both files.
 Checking File Versions Checking File Versions
Downloading and Installing the VRDRUPD.EXE Update
Realtek Network Cards and Windows 98
- When Microsoft released Windows 98 they did not include the correct drivers for Realtek network cards.
- Using Microsoft's drivers for Realtek network cards can cause corruption in files accessed over the network, including ACT! databases.
- You should check the manufacturer of the network card installed in every computer running Windows 98. Please see the Checking Network Card Manufacturer section of this document for instructions on how to find out the manufacturer of the installed network card.
- If you have determined the installed network card is made by Realtek you need to download an updated driver from Realtek. Please see the Downloading Updated Driver section of this document for information on how to download and install the updated driver.
Checking Network Card Manufacturer
Use the following procedure to determine the manufacturer and model of the installed network card:
1. From the Windows Start menu, choose Settings and select Control Panel.
2. Double-click on the System icon.
3. Under the Device Manager tab, click on the plus sign to the left of Network Adapters to expand the list. Windows will list all installed network adapters.
4. If you see a Realtek adapter listed you need to download and install an updated driver from Realtek. Note the model of the Realtek adapter and see the next section titled Downloading Updated Driver for instructions on how to download an updated driver.
Downloading Updated Driver
Use the following procedure to find an updated Realtek driver to download:
5. Go to the following Web site: http://www.realtek.com.tw
6. Click the Downloads button, then point to Communication Network ICs.
7. Click on the appropriate drop-down and select the model of your Realtek adapter, then click Go.
8. A list of available drivers will come up. Download the appropriate driver and save the file to the Desktop.
9. When the download is complete, open the file you downloaded. A folder will be created on the Desktop with the install files for the driver. There will also be a document included with installation instructions included in the folder. If you need any additional help updating the Realtek driver please contact Realtek support.
Windows ME, 98, and 95 Configuration File
We highly recommend checking the CONFIG.SYS file on computers running Windows 95, 98, and ME to be sure be sure certain settings are set correctly. Please use the following procedure to examine variables in the CONFIG.SYS file and correct them, if necessary.
1. Click the Windows Start button, then click Run. The Run dialog appears.
2. In the Open field type sysedit, then click OK.
3. Click the CONFIG.SYS window to bring it to the front.
a. If any lines begin with SWITCHES= type REM at the beginning of that line. The line should then begin with REM SWITCHES=.
b. If any lines begin with FCBS= type REM at the beginning of that line. The line should then begin with REM FCBS=.
c. If any lines begin with SETVER= type REM at the beginning of that line. The line should begin with REM SETVER=.
d. If any lines begin with FILES= change the line to FILES=200 unless the line already has FILES=200.
4. Click the File menu, then click Save.
5. Click the File menu, then click Exit.
6. Reboot the computer for the changes to take effect. |